Daily Archives: August 21, 2013
Home Remedy To Get Rid Of Acid Reflux
Acid reflux, also referred to as gastroesophageal reflux disease (GERD), is characterized by a burning sensation that runs anywhere from the back of the throat to the stomach. It may also be accompanied by a sour or upset stomach. Although acid reflux is generally harmless, it can be rather uncomfortable. Fortunately, there are home remedies that can reduce and even eliminate acid reflux.
Relief
There are several home remedies that can treat acid reflux. According to the National Digestive Diseases Information Clearinghouse (NDDIC), one of the most effective remedies is to simply raise the top of your bed. This can be done by placing 6- to 8-inch wooden blocks under the bed post. This method is effective because it’s easier for the body to digest foods when lying in a more upright position. An alternative is to sleep with extra pillows. At the very least, avoid lying down for at least 3 hours after eating.
Lifestyle Changes
In addition to home remedies, lifestyle changes can be an important step in eliminating acid reflux. According to the Mayo Clinic, important lifestyle changes include avoiding alcohol and cigarettes, controlling weight, eating slowly and eating small, frequent meals. A food diary can also be helpful in controlling acid reflux. Make a list of every food consumed throughout the day and whether or not acid reflux occurred afterward. In most cases, trends will emerge and those foods should be eliminated from the diet.
Benefits
The main benefit of home remedies and lifestyle changes in treating acid reflux is that they are currently the safest way to stop it from reoccurring. Over-the-counter and even most prescription medications mask the symptoms and ease the discomfort of acid reflux, but they will not provide any permanent relief. Surgery provides permanent relief, but that comes with additional risks. Home remedies are also a more economical way to relieve the discomfort of acid reflux.
Misconceptions
Often, the terms acid reflux and GERD are used interchangeably. However, according to the Mayo Clinic, this is incorrect. Acid reflux is a symptom of GERD that occurs in individuals rarely—usually after eating a meal that doesn’t agree with them. GERD is a chronic condition that can be aggravated by certain foods or stress but can be present regardless. If certain foods are known to trigger acid reflux, it’s best to avoid them or acid reflux can develop into a chronic case GERD.
Warning
There are several treatments for acid reflux–the most severe being surgery. Anyone who experiences acid reflux symptoms several times per week should contact a health care provider. It’s best to treat the symptoms before surgery is required. People who experience any type of chest pain, shortness of breath or arm or jaw pain along with acid reflux should seek immediate medical help. According to the Mayo Clinic, this could be the sign of a heart attack.
Proper Way To Tweeze Eyebrows
 frame should never compete with or detract from the painting it surrounds. While attractive on its own, the right frame should enhance the beauty of the art inside. In the same spirit, neatly tweezed eyebrows frame your face and should enhance your natural beauty. By investing in the proper tools and taking your time, you can master the art of properly plucked brows.
1.Stand in front of a well-lit mirror and comb your eyebrow with an eyebrow brush. Trim long hairs off the top of the brow with manicure scissors. Rest one edge of the scissors against your brow bone and carefully snip stray hairs that extend beyond the desired top line of your eyebrow.
2.Place a pencil at the bridge of your nose, so it covers your tear duct and extends to your brow line. The place where your brow line and the pencil intersect is where your brow should begin. Make a small mark with an eyeliner that can be seen through your brow hair to help you visualize the proper point.
3.Lay a pencil along the outside corner of your eye where your lashes end. Where the pencil and brow bone intersect is where your brow should end. Mark the point with eyeliner.
4.Observe your brow area closely. You should be able to detect a natural arch that peaks (more or less) above the iris. Remember the goal of tweezing is to enhance your natural arch, not to create a false one.
5.Anaesthetize your brow by rubbing an ice cube over the eyebrow area or wiping it with a cotton ball dipped in witch hazel.
6.Pluck errant hairs from the bottom of your brow with a sharp pair of slant-tip tweezers. Remove one hair at a time to prevent over-tweezing. Follow the shape of your natural arch and avoid tweezing at the top of the brow line.
7.Look at the inner and outer points of your eyebrow. Tweeze away any hairs that extend past the proper points.
How To Use Home Waxing Kits Without a Big Mess
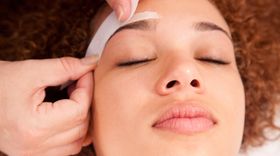 Waxing is one of the techniques used for hair removal. There are home waxing kits available for those that do not have the time or money to have this done professionally. However home waxing can be messy if you are not careful. Additionally improper waxing technique can result in irritation and torn or bruised skin. Learn the best way to apply wax without making a mess.
Instructions
Home Waxing
1
Let hair grow to the recommended length. Most kits recommend hair be at least 1/4 inch long. This is necessary as the wax needs to be able to grab the hair. If hair is too short then the wax cannot surround the hair or remove it. But if the hair is too long then it will break off and not be removed entirely from the skin.
2
Exfoliate the area that will be waxed 24 hours in advanced with a buff puff or body scrub. Exfoliation will get rid of any dead skin cells. This allows the wax to easily attach to hair and not pull off any skin when it is removed. However, if you exfoliate just before waxing then the new skin will be sensitive and become inflamed and irritated.
3
Take an ibuprofen at least an hour before waxing. Waxing can hurt and an ibuprofen can make a difference.
4
Wash and dry skin thoroughly. Apply baby powder to ensure that the skin is dry. Baby powder will also take care of any oil on the skin.
5
Lay down an old towel or newspapers where you will be waxing. This will catch any wax should it drip onto the floor and makes clean up very easy. With newspapers you simply need to gather them up and recycle. This eliminates the need to scrape wax off the bathroom floor.
6
Heat the wax to the specified temperature and keep it at this temperature. A small wax heater or water bath can be the easiest way to ensure the wax is at the correct working temperature. If the wax is too hot then it will burn skin and drip everywhere. If the wax is too hard or cool it will be difficult to apply and will not grab the hair for removal. This can be the most difficult part of home waxing. If using a microwave to heat the wax, reheating it every few minutes can help ensure the wax is at the proper temperature. The wax should be between 43 and 68 degrees Celsius.
7
Apply the wax with the provided spatula or roll on. To be as neat as possible, scrap off the spatula after each application. If wax is left on the spatula then it can begin to harden and this will make it very difficult and messy to apply additional wax. It is not necessary to apply large globs of wax. Smaller amounts applied to small areas can result in a much better waxing job. Roll ons make less of a mess than spatulas but most kits will contain spatulas. If waxing is a frequent activity then purchasing a roll on is a good idea.
8
Apply the strip provided in the kit to the waxed area following the manufacturer’s instructions. Make sure to smooth out the strip several times before pulling it off. Ensure that the strip completely covers all of the wax. If the edges of the wax are not covered cleanup on your skin difficult can be difficult. Gently rubbing the strip onto the wax helps it adhere.
9
Grab the bottom end of the strip and pull in the opposite direction of the hair growth. Hold the skin taunt with your other hand for easier hair removal.
10
Repeat the waxing procedure until all the hair is removed.
11
Apply baby oil to a soft cloth and gently rub the skin to remove any small spots of wax that were not removed in the waxing process. Do not rub too hard as this can irritate the skin. The wax will come off quickly.
12
Turn off the water bath or wax heater and allow wax to cool. Depending on how much wax was used, you can save the tub for further applications. Allow the wax to cool completely and store in a dry place. Clean off the roll on or spatula and store as well.
How To Keep Lipstick From Bleeding
 Few things can botch your glamorous look more than your lovely lipstick leaking into those tiny lines that form around your lips. You’ll likely notice this happening when you wear brighter shades of lipstick such reds and berries. The key to preventing your lipstick from feathering is to create a barrier between your lip color and those fine lines, which naturally appear over time. With a little extra prep before applying your lipstick, you can prevent feathering and bleeding and make your lipstick last longer.
Instructions
1
When applying foundation or powder, cover your lips as well as the rest of your face.
2
Outline the entire lip area with a neutral shade of lip pencil or a shade that blends in with your lipstick. Choose a lip pencil that has a waxy finish. The wax will help create a barrier to which any migrating lip color will adhere. This also will define your lips for the rest of the process.
3
Apply lip balm to your lips. Work the balm all the way to the edge of the outline of your lips.
4
Apply your lipstick. Use a lip brush to ensure that lip color stays in place longer.
How To Apply Bronzer Makeup

Bronzer brings a brilliant radiance to your skin without the risk of sun damage. Select a shade no more than two shades darker than your skin tone. You may need to start with a slightly darker base foundation to keep the look natural, suggests “Cosmopolitan” magazine. You can choose a tinted moisturizer to keep the look light and fresh or go with a powder version if you prefer more control over the application.
Instructions
1
Prepare your brush by cleaning it regularly with warm soap and water and allowing it to air dry.
2
Load the brush with bronzer by tapping the tip into the powder. This keeps the brush from becoming overloaded and depositing too much bronzer on your face.
3
Apply the bronzer in a tapping motion on every area that tans in the sun, such as the bridge of your nose, your forehead, your cheekbones and a little of your chin.
4
With the remaining bronzer on your brush, sweep lightly across your entire face and down onto your neck, fading onto your chest. Reload brush lightly if necessary.













Comments: